
How to Install Bathrooom Floor Tiles Step by Step
Fitting Bathroom Tiles is the topic we will discuss today, and how I will replace the dated floor tiles in this small bathroom with these great large format tiles that open up space.
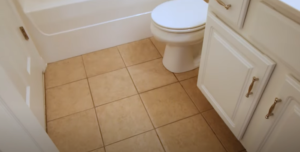
Stay tuned. I’ll show you just how I did it. This small bathroom floor has been on our remodel list for a while, and one of the things I hate most about it is the beige tile floor in the dark grout now. We’re remodeling the entire fitting bathroom tiles.
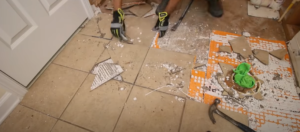
We ripped everything out of the tub and into the mirror today and I’m going to be focusing on the floor install using the new line of tile tools from Ridgid After taking everything else out for the fitting bathroom tiles I moved on to the floor I used a large demo bar to pry up the tiles. Late but ripping up the tiles shouldn’t be this easy. They didn’t install it correctly, which made my life easier, but don’t expect yours to necessarily go as smoothly. You may need a hammer drill with a scraping blade to get up all the mastic off the subfloor.
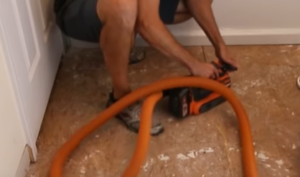
After I installed the tub in the shower, which you’ll see in the next video, I started prepping the subfloor for installation. My OSB subfloor was mostly flat. Still, the seams were raised a bit, So I grabbed my belt sander, and I flattened all the seams even with the rest of the floor. I’m using House Staging from Hyderabad Help to guide me to bathroom tiles fitting.
Types of Bathroom lay Floor Tiles
Types of floor tile materials House Staging we use in laying bathroom Floors
- Wood Bathroom Tiles
- Vinyl Bathroom Tiles
- Ceramic Bathroom Tiles
- Concrete Bathroom Tiles
- Laminate Bathroom Tiles
- Wall Bathroom Tiles
- Carpet Bathroom Tiles
- Porcelain Bathroom Tiles
- Cement Bathroom Tiles
- Outdoor Bathroom Tiles
- Kitchen Bathroom Tiles
- Plywood Bathroom Tiles
- Stone Bathroom Tiles
- Mosaic Bathroom Tiles
- Linoleum Bathroom Tiles
- Marble Bathroom Tiles
- Slate Bathroom Tiles
- Ceiling Bathroom Tiles
- Quarry Bathroom Tiles
- Pebble Bathroom Tiles
- Rubber Bathroom Tiles
- Roof Bathroom Tiles
- Terracotta Bathroom Tiles
- Terrazzo Bathroom Tiles
- Cork Bathroom Tiles
- Plastic Bathroom Tiles
It’s the same stuff that was on there before. It’s an alternative to the backer board, and it’s both an uncoupling membrane and a waterproofer. I measured the floor to cut the data roll to length, and it’s easily cut with scissors or a box cutter. I notched it for the doorways, leaving a quarter-inch gap from the walls.
The second piece to fill out the room is not full width, So I cut it down to size, and I laid it on the floor to reference the toilet flange I used my box cutter to cut out the hole for the flange.
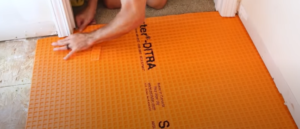
So it just slipped over the opening for an OSB subfloor installation, it calls for modified mortar between the wood and the underside of the Ditra I mixed up a batch of the mortar using the new rigid mixer here, and this thing makes short work of Mixing. It’s got the power to do it versus a common drill, which you can easily burn up if you’re mixing too much mortar and pushing it too hard. I got the mix to a thick milkshake consistency.
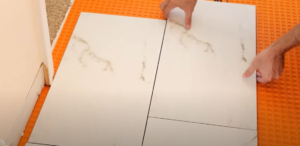
It wasn’t exactly perfect But it was definitely way better than the original install Next I spread the mortar over the rest of the subfloor and pulled in the smaller sheet of Ditra the fit was perfect up against the other sheet and for full water proofing a layer could also be added to this joint You can actually start laying tile on top of the dieter right away, but it was late So I came back the next day to start the tiling I’m using a 24 by 12 inch large format tile and has spent some time trying to figure out the best layout I Used a program called Sketchup to layout the size of my floor and my tiles with the grout spacing that I wanted This let me try different staggering and placements to see how they looked right there on the computer screen my goal is to have as many full tiles as possible and make sure they didn’t have any small slivers near the walls or the doors we settled on a brick pattern layout with a third of a tile overlap between the tiles and This helps to reduce lipid when two tiles aren’t level with each other Which is more prone on these larger tiles because they aren’t always flatAnd when using a printed pattern on the tiles it helps to lay out all the tiles that you have across different boxes.
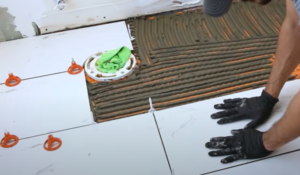
So you can avoid duplicates next to each other If you do have a duplicate that you’ll have to use just make it a cut piece flip it in for Inverses the other one or hide it underneath the vanity or the toilet after we got the layout we wanted we labeled all the tiles and then transfer that to a printout of the computer layout we designed That way in the midst of laying the tiles we could use it as a reference and not get mixed up and put those duplicates back together if you’re new here and you like what you’re seeing so far go ahead and subscribe and say hello down in the comments The door jams needed to be cut back a little for my thicker tile and mortar bed I used to tile on a small spacer to represent the mortar when I cut the jams with my JobMax multi-tool As a final piece of prep work I slid the tiles under the door jamb and set them in place with spacers just like they’d be at install Then I used the painters tape and marked eight inches on the tile as a reference for my 1/3 overlap And I figured out the cutoff piece size that I’d need for the front of the door For the bond between the dieter and the tile I needed to use an unmodified mortar Unfortunately, they only had two unmodified mortar in the gray up in my local store it’s better to use a white mortar when you’re using light grout if you can get it, I mixed up the mortar the same as before and while it was slacking I cut the first half tiles to size that would go against the tub And the most important joints visually here are gonna be the ones at the door so I started in the corner by the door on the tub and made the install a little bit harder since typically you would start on the far wall and work your way out row by row ut I didn’t want to risk the cumulative error throwing off my joint at that last row by the door. I worked the mortar into the waffle pattern and back buttered the large tiles to make sure that I had a good bond. Then I put them in place to space the tiles. I used the rigid level Mac system.
It pulls all the tiles flush with each other. It’s a cool system and I’ll have a link below in the description. I was working my way to the far wall and I needed to make the cuts for the toilet flange Now at this point we were in the heat of the moment and that mastic was setting up, so I didn’t film it but here’s how I made the cuts. Curb cuts can be notched out with a wet saw, but I used my angle grinder with a diamond embedded wheel, and the key here is to take light sweeping cuts and don’t let the grinder bog down and dry cutting tile throws a lot of dust and chips. So make sure you protect your eyes in your lungs. I went around the toilet, and I worked my way out the door laying the last full tile right in front of the doorway now, the level max system did a great job of keeping the tiles aligned. It sure beats the old days of using a carpet covered in 2×4 to beat the tiles into place now after the mortar dried for 24 hours I came back to snap off the stems of the spacers. The part right here is, the most fun part of the whole job is a Swift kick snaps the stems off of the spacers and the part left is under the tile The tops can be unscrewed and used again. I feel like this might be like a new therapy technique to relieve stress. Clean up the joints of any excess or loose mortar.
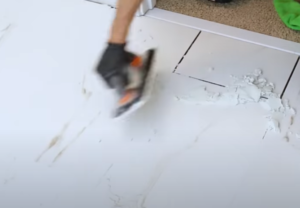
I work the grout into the joints using a grout float at a 45-degree angle to the joint If you push the grout in parallel or perpendicular with the joint lines Then the edge of the float is going to fall in and catch, and it’s just going to pull the grout out After filling in all the ground I rinsed the excess off the damp sponge.
you want to wring the sponge out well so that the grout doesn’t get more water in it because if you get more water, it can cause discoloration and weaken the joint I let the grout dry overnight, and I came back the next day to buff off any grout haze, and There were some tough spots there where I had to use a haze remover to get it off, but it works well with a microfiber towel, I Used to grout colored caulk to go between the tub and the flooring, and then I reinstalled all baseboards, And the floor turned out awesome
It’s a great focal point for the small Fitting Bathroom Tiles in the light-colored large-format tile that makes this room feel bigger You will see the full bathroom remodel it is going to be right there when it goes live. Book a service today to design your custom Fitting Bathroom Tiles.